The Bearer oF Metal: NSX-T Edge Transport Nodes
NSX-T Edge transport nodes have two forms in terms of deployment (current version is 3.1.x), this blog will tackle 4 aspects of NSX-T Bare-Metal Edge Transport Nodes, where we will be talking about the use cases, the requirements, the configuration flow and configuration details.
Use Cases:
The main use case behind using bare-metal edge transport nodes, is throughput and bandwidth where north-south traffic requirements might be more than ~[72-to-80]Gbps as at this point in time the configuration maximum is capped at 8 ECMP paths being where also ideally you’d need the Edge VM transport nodes to reside on a different host (anti-affinity rules applied) so that to obtain the most of the 8-SRs in ECMP mode.
On the other hand, obviously when you cannot do ECMP _AND_ you need to go Active/Standby for NAT and Edge Security services for example _AND_ you require very high throughput then bare-metal edges prevails as use case as well, also its good to know that Edge VM transport nodes are not supported on KVM, so if you’re intending to use NSX-T purely for your KVM environment and you do not wish to run Edge VM transport nodes on ESXi hosts, then bare-metal would be a great option as well.
Further more, bare-metal is supported to have 16 Fast Path (fp-eth##) interfaces, so thats 16 pNICs per Edge transport node, so you can imagine the different combinations of uplink profiles, transport zones that can be attempted and applied.

Requirements:
- Sizing guidelines (could differ based on future versions):
- 8 CPU Cores with 32GB Memory, and 200GB disk [minimum].
- 24 CPU Cores with 254GB Memory, and 200GB disk [recommended].
- General guideline, if the server can run Ubuntu then it’s good to go from a compute/storage perspective to run the NSX-T bare-metal edge transport node.
- Only specific pCPU and pNICs are supported and recommended.
- VMware Docs Reference.
Configuration Flow:

Configuration details:
- Make sure that the hardware is supported (however this can also be tested in a lab where the bare-metal edge transport node can be simply a virtual machine =)).
- Make sure the underlay configuration is done and that the MTU is configured on the physical ports to match what was agreed upon in the design (minimum is 1600).
- Download the ISO from VMware’s Customer Connect.
- Once the ISO is mounted and the server is booted, you can choose “Automated Install” however if you don’t have DHCP the initial network configuration won’t pass and you’ll have to provide the same input from the “Interactive Install“, so I’d recommend using the “Interactive Install” procedure.
- You’ll be asked if you want the keyboard layout to be automatically detected, this is up to you, in my case I would select “No” and select the keyboard layout you wish, mine is “English“.
- Next you’ll be prompted to select the primary network interface, select the first one (we won’t be doing anything with it though because we intend to bond the management interfaces for HA rather than using a single physical interface).
- Then you’ll be prompted to select if the VLAN for management is tagged or not, again it doesn’t matter at this point in time, so select “No“.
- Now the wizard will attempt to assign an IP for the interface via DHCP, once its fails you can select “continue” and then you’ll be prompted with additional options to either configure the network manually or leave it for later, our selection will be “Do not configure the network at this time“.
- Now you’ll be prompted to type in the hostname of the bare-metal edge transport node, this will be the BIOS name only and not the FQDN.
- Lastly you’ll be prompted to input the NSX-T Manager FQDN, since we didn’t establish network connectivity we shall skip this step by removing https:// and hitting “Continue“.
- At this point in time the operating system is being installed and this involves the partitioning of the detected volume.
- Login as admin -> the default password is default which you’ll need to change on first login and the server will reboot automatically afterwards.
- Login as root -> the default password in vmware which you’ll need to change on the first login and no reboot will take place here:
- Enable SSH service -> systemctl enable ssh
- Start SSH service -> systemctl start ssh
- Logout from root -> exit
- Login as admin.
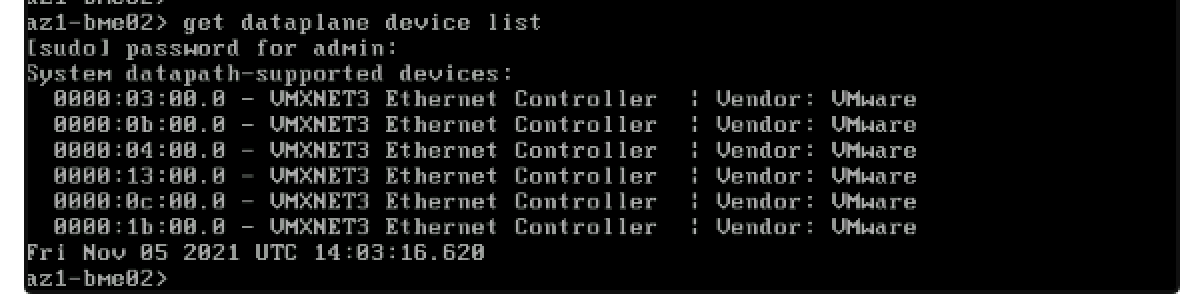
- run -> get dataplane device list <- here you’ll be prompted to re-enter the admin user password, the you’ll be presented with a list of the devices that are currently claimed as fast path devices.
- Now what we need to do, is claim only the interfaces that we want for fast-path, and to know this you can run -> get interfaces | more <- this will give you a detailed list of all interfaces and you’ll be able to see match the pNIC MAC with the PCI address as well. In addition you’ll notice that the first interface is bond0 (at this point in time no interface is part of the bond), so to be smart about this we only need to get the MAC and PCI of the management interfaces and the rest would be fast-path which are the interfaces that we need to claim, and in my lab’s scenario its the first two interfaces.
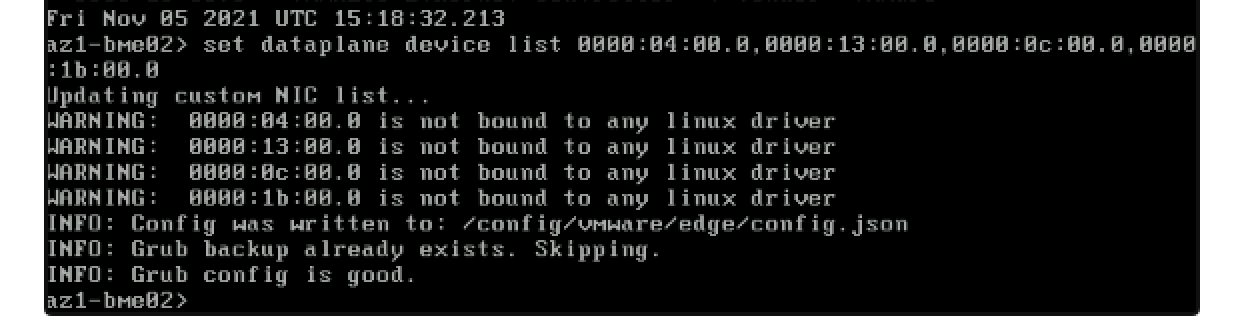
- run -> set dataplane device list pNIC-PCI-01,pNIC-PCI-02,pNIC-PCI-## (don’t mind the driver warning as this is because I’m doing it on a virtual machine ;-)).
- Now you need to reboot the server.
- After the reboot, run -> get dataplane device list <- you’ll notice that the first two pNICs are now detected as kernel interfaces.

- run -> set dataplane device list pNIC-PCI-01,pNIC-PCI-02,pNIC-PCI-## (don’t mind the driver warning as this is because I’m doing it on a virtual machine ;-)).
- Now that we’ve set the fast-path devices, we can work on the management interface, when you now run -> get interfaces | more <- you’ll notice that you’re able to see bond0, followed by eth0 and eth1 (eth2 in my case) respectively.
- run -> set interface bond0 ip <ADDRESS/MASK> gateway <GATEWAY ADDRESS> plane mgmt mode active-backup members eth0,eth1 primary eth0
- Alternatively if this is a TRUNK interface you can run:
- set interface bond0 vlan <enter VLAN ID> plane mgmt
- set interface bond0.VLANID ip <ADDRESS/MASK> gateway <GATEWAY ADDRESS> plane mgmt mode active-backup members eth0,eth1 primary eth0
- Alternatively if this is a TRUNK interface you can run:
- This will set the management IP ownership to bond0 which is backed by two interfaces with active/standby failover protection.

- run -> set interface bond0 ip <ADDRESS/MASK> gateway <GATEWAY ADDRESS> plane mgmt mode active-backup members eth0,eth1 primary eth0
- Since we’ve initially enabled the SSH service, we should be able to SSH to the edge node now.
- Now we’re ready to join the edge node to the NSX-T Manager:
- SSH to the NSX-T Manager and run -> get certificate api thumbprint <- copy the thumbprint output.
- SSH to the NSX-T bare-metal edge transport node and run -> join management-plane <NSX-T Manager IP> username admin thumbprint <THE THUMBPRINT YOU COPIED> <- once you hit enter you’ll be prompted to enter the admin user password, the process takes a couple of minutes <give or take>.

- Now the edge transport node is visible from the NSX-T Manager UI directly.
- From here this is now normal edge transport node configuration, make sure to configure DNS, NTP and the domain search path, then you can configure the NSX switches based on the intended design (do note that if you’re seeing the fast interfaces via get physical-port you’ll notice that the MTU is 1500, and this will not change until the NSX switch is configured and the MTU from the uplink profile is applied).
Thank you for taking the time to read this =).
Hey Abdullah,
Great article!
What was the config of your VM that you used for testing?
Guest OS – Assume this was Ubuntu (Linux 64bit)?
CPU – ?
Memory – ?
Devices other than Nics – removal or otherwise
Thanks,
Rob
Thank you Abdullah :)